How to Make JIRA Time Tracking Report
Learn how to create effective JIRA time tracking reports to keep track of your team's progress on tasks and projects. This comprehensive guide will help you streamline your reporting process and improve productivity.

Atlassian products are widely known: for example, JIRA is the globally favored choice for task and project management.
Businesses and teams also use it as a reporting tool:
- to track progress
- to assess compliance with deadlines
- to receive precise statistical data in real time.
This guide is designed for project managers, Agile team leads, and business owners who utilize JIRA for project management.
Whether you need to export and analyze time data for payroll, billing, or performance evaluations, this comprehensive resource will help you navigate how to make JIRA time tracking report.

After reading this guide, you will learn the following.
✅How to set up and customize JIRA time reporting.
✅Discover how to create and export Jira time tracking reports.
✅Understand why TMetric is considered the best solution for:
- JIRA time tracking report by user
- JIRA time tracking report by sprint.
How to Set Up Time Tracking to Jira
Jira time reporting implies that:
- time tracking is configured
- work logged
- JIRA timesheet report is generated.
Here is a step-by-step guide to help you through the process.
Configuring Time Tracking in Jira
Basic Implementation
Navigate to Jira Administration > System > Time Tracking
✅Configure default estimation and tracking settings:
- Hours per day
- Days per week
- Time format (hours/minutes)
- Default unit for time estimates
Enabling Time Tracking for Projects
Go to Project Settings > Features
✅Enable the Time Tracking feature
✅Configure project-specific settings if needed
Creating Time Tracking Reports
Built-in Reporting Options
- Workload Report
Access through Project > Reports > Workload
⌛Shows time spent versus time estimated
🔍Filters by sprint, component, or custom fields
🔖Exports to CSV format
Time Tracking Report
Navigate to Issues > Search for Issues
✍️Create a filter for relevant issues
Add time tracking columns:
- Original Estimate
- Time Spent
- Time Remaining
Advanced Custom Reports
Using JQL (Jira Query Language)
project = "Your Project" AND worklogDate >= startOfMonth()
AND worklogDate <= endOfMonth()
ORDER BY created DESC
Creating Dashboard Gadgets
- Add Workload Pie Chart
- Configure Time Tracking Statistics
- Set up Time Since Issues Report
Exporting Time Data
Standard Export Methods
From Issue Navigator:
- Search for relevant issues
- Export > CSV/Excel
- Include time tracking fields
Advanced Export Options
REST API Integration:
- Use the
/rest/api/3/worklogendpoint - Filter by date ranges
- Aggregate data programmatically
Best Practices
- Accurate Time Logging
- Log time immediately after task completion
- Use consistent time formats
- Include detailed work descriptions
- Tag activities appropriately
Report Configuration
- Set up recurring reports
- Define standard templates
- Create role-based dashboards
- Establish regular review cycles
Common Challenges and Solutions
- Data Accuracy
- Regular audits of time entries
- Standardized logging procedures
- Team training on time tracking
Reporting Limitations
- Using custom fields for additional tracking
- Implementing third-party apps for advanced reporting
- Creating specialized JQL queries.
Plugins can help streamline your time tracking process and improve workflow efficiency.
How to Add Plugin
🔢To start, it is necessary to have administrator rights on the instance of Jira you are going to work with.
Then:
a) Pick at the top Jira Administration and then select Manage apps/plugins
b) Click the Find new apps or Find new add-ons link
c) Type in the Research as “time tracking” or “Jira synchronization”.
d) Select the plugin you wish to install and click on install.
e) Agree to the license terms and then wait while the program is being installed.
f) Set the basic settings that appear when installing it.

Jira Synchronization
Using Jira Synchronization for Time Tracking Reports
Once installed, there are several options to explore.
a) Set up Time Tracking:
✅Click on the project name under project settings and select Time Tracking
✅Set your working hours/days
✅Set original estimates.
b) Create Time Reports:
✅Navigate to the Reports section
✅Select Time Tracking Report
✅Choose your desired parameters:
- Date
- Projects/issues to include
- Users to track
- Types of work to include.
c) Synchronize Data:
✅Subsequently, the user needs to set up synchronization intervals that will automatically commence
✅Choose which fields to sync
✅Set up field syncing.
TMetric: Best Jira Time Reporting Software
TMetric is a productivity application that helps track the time spent on tasks and projects and manage work in JIRA, making the process of tracking time frictionless.
Why TMetric is the Best Solution for Advanced Jira Reporting
While Jira provides basic time tracking and reporting features, TMetric enhances these capabilities significantly:
- TMetric offers customizable reports that provide deeper insights into time usage and team performance.
- The tool seamlessly integrates with payroll systems, making it easier to manage billing based on tracked time.
- TMetric intuitive interface simplifies the process of logging time and running reports, reducing the learning curve for new users.
- Users get real-time updates on time spent on tasks, allowing for more agile project management.
Here’s a detailed instruction on how to use TMetric with JIRA.
Step 1: Sign Up for TMetric
Visit the TMetric Website.
Sign Up: The user account will open, click on Sign Up.
Step 2: Add TMetric Browser Extension
Download the Extension: Install the TMetric browser extension as the browser add-on (for Chrome, Firefox, etc.).
Step 3: Integrate TMetric with JIRA
Log in to JIRA: Open your JIRA instance.
Open an Issue:
- Go into any issue that you have on your JIRA project.
Start Tracking Time:
- In the browser’s toolbar, there is the icon of the TMetric program.
- Choose the issue that you want to clock time against.
- Click Start to start the timer.

Step 4: Log Work Automatically
Automatic Time Logging: TMetric will have the ability to log the spent time on the issue.
In case you need to pause or stop the timer – feel free to do it.
Step 5: Generate Reports in TMetric
Access TMetric Dashboard: To get started with TMetric, sign in to the application using your login and password.
Generate Reports: Go to the Reports section.
- Select the type of report in position (For example, Time Sheet, Project Summary, Task Summary).
- Choose a timeframe and other options if necessary.
- To view the data click on Generate Report.

The Bottom Line: Advantages of TMetric Integration with JIRA
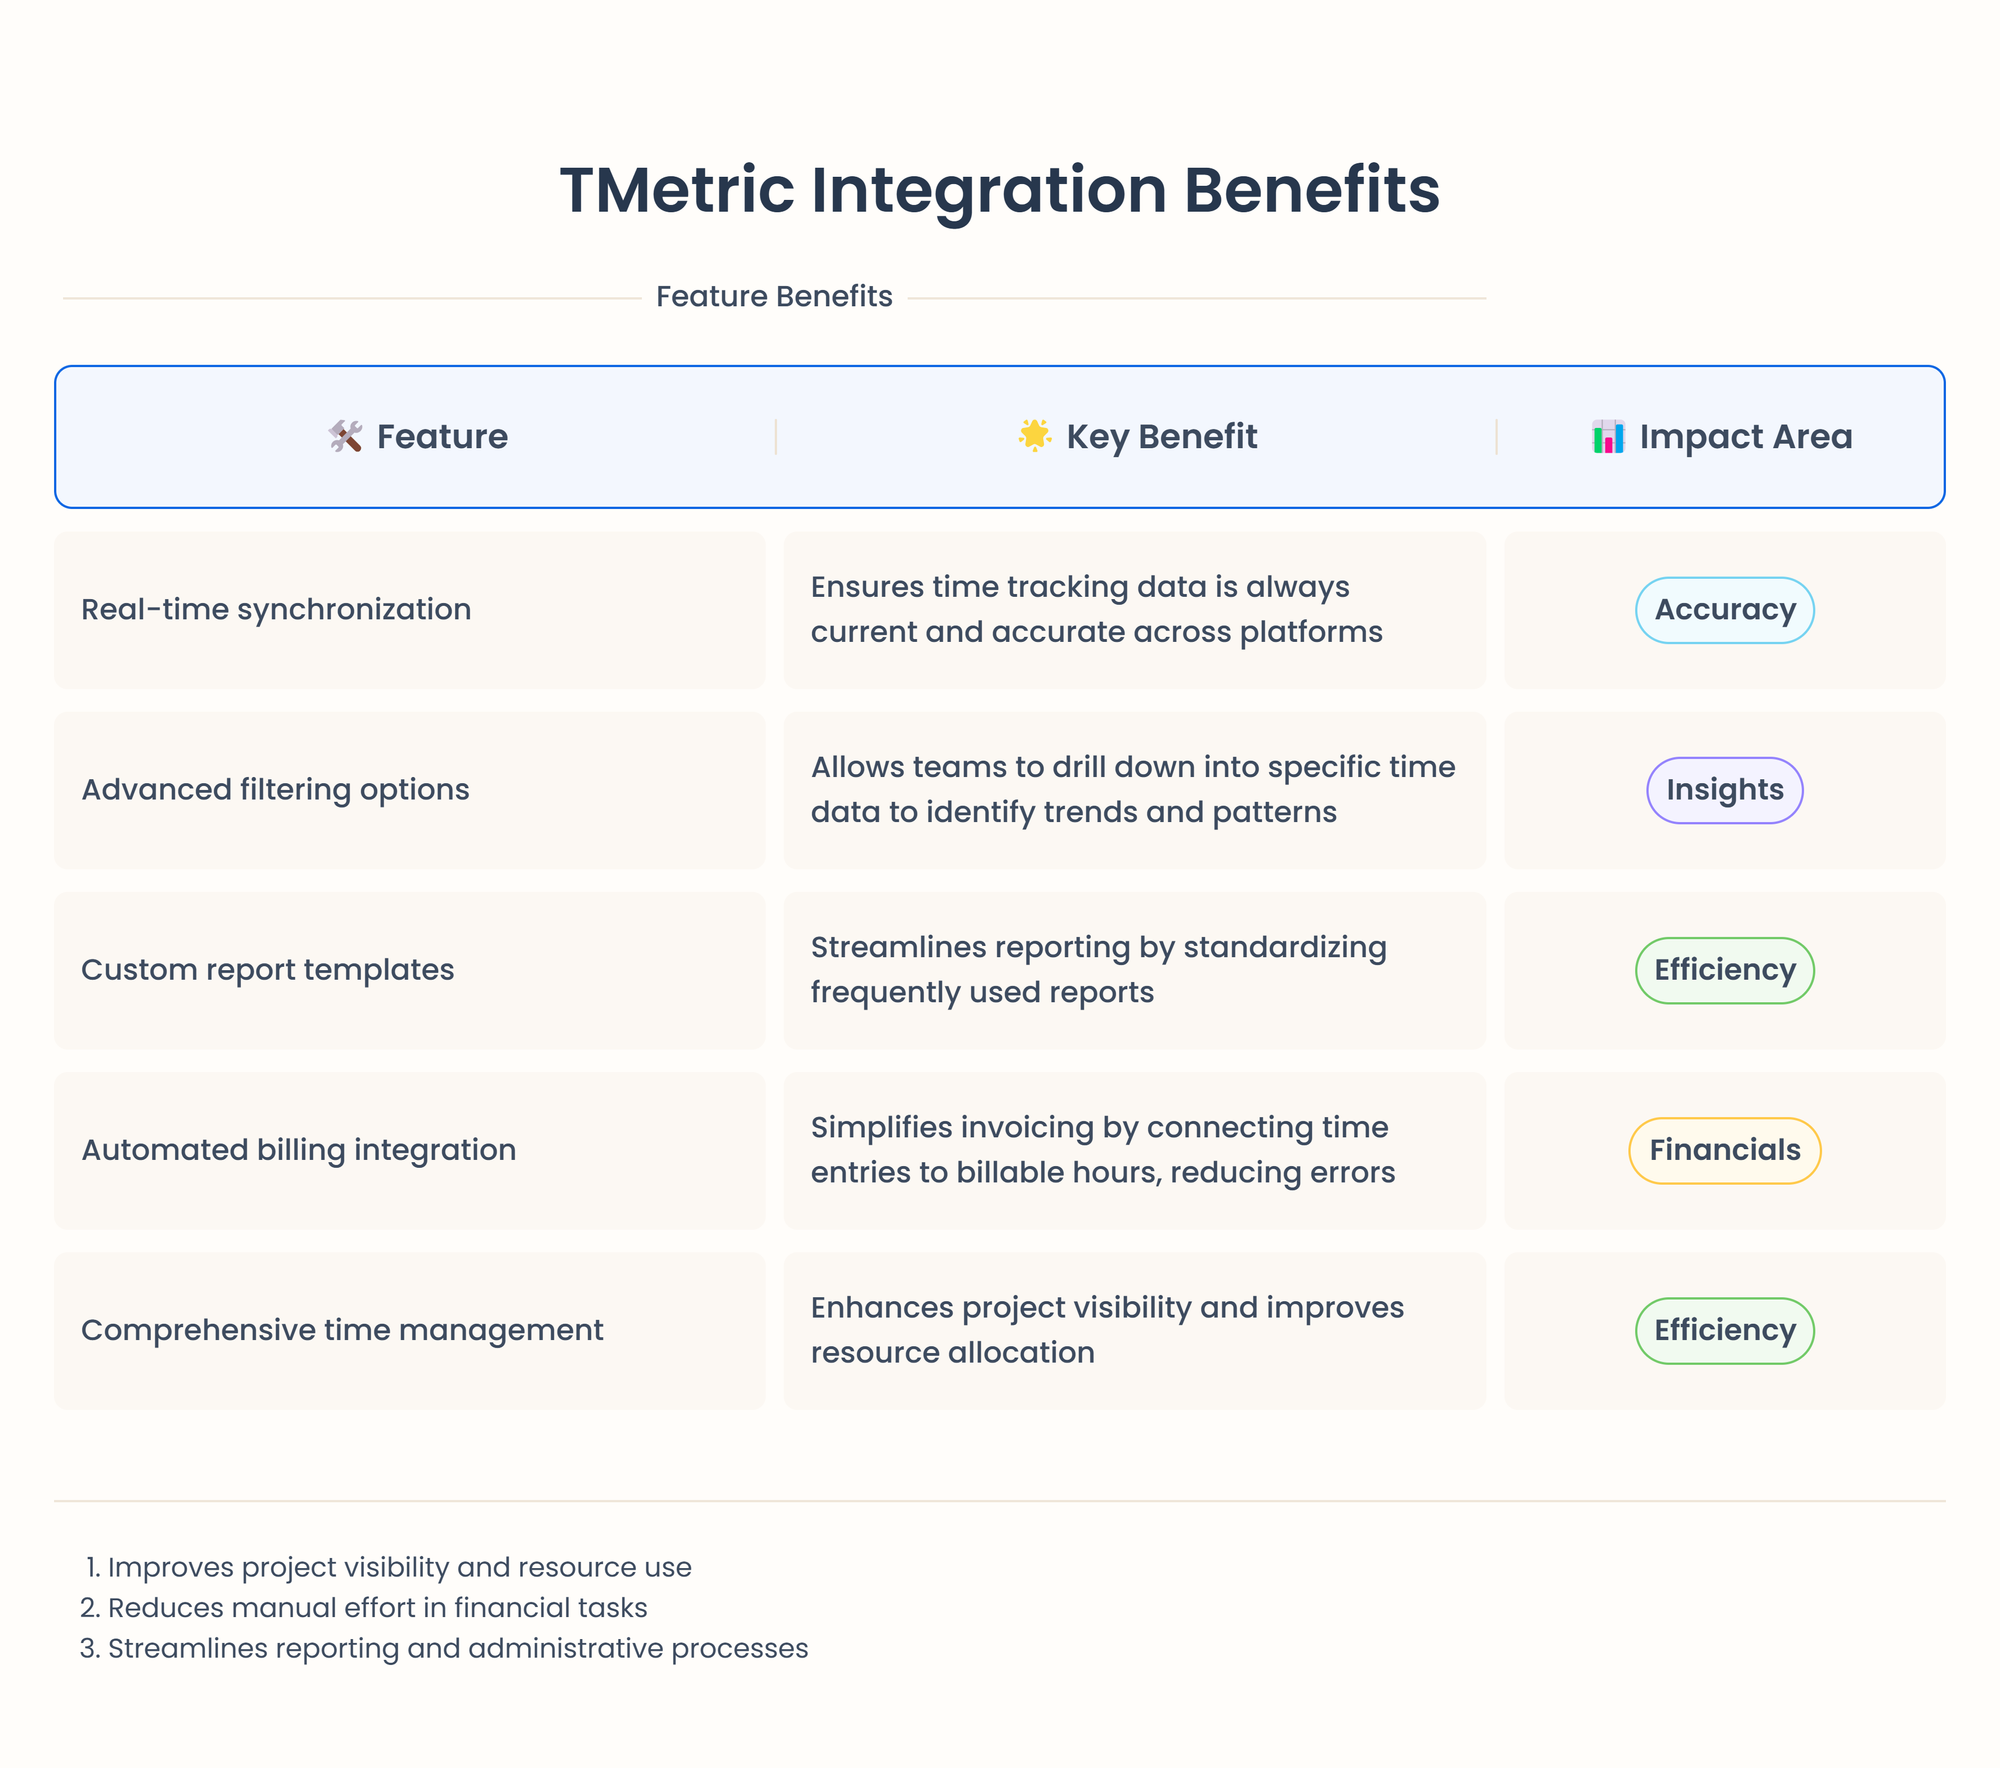
Seamless Integration
- TMetric is closely linked to JIRA, which means you will not have to switch apps in order to track time.
- Allows the time logged to be auto-synchronized with individual JIRA issues.
Automatic Time Tracking
- This feature enables the Start button on timers and can be launched directly from JIRA
- It records time spent on issues, which eliminates manual data entry.
Jira Time Tracking Reports
TMetric provides a robust reporting system that helps organizations track time, analyze productivity, and make data-driven decisions.
Below, are the main report types and their practical applications.
Project Reports
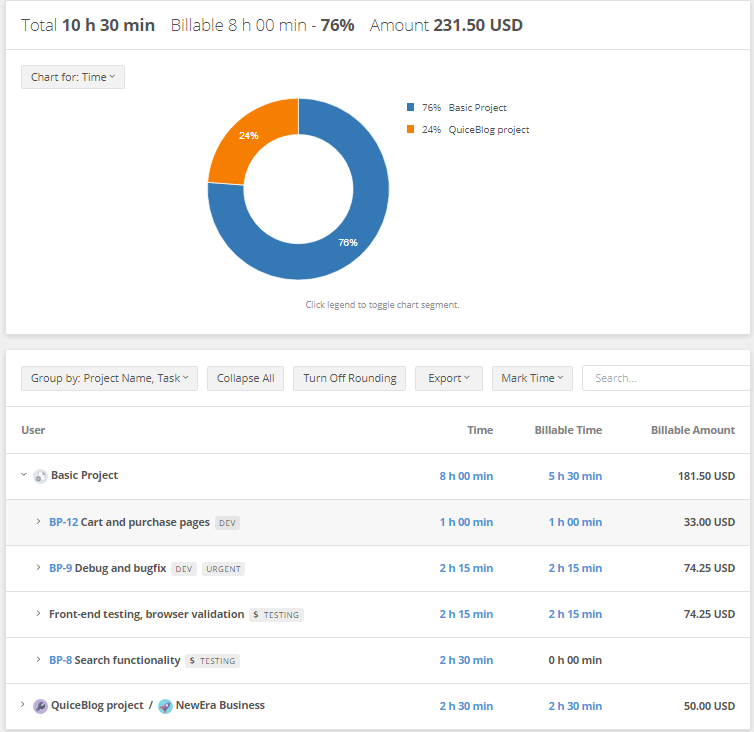
Overview: Project reports provide detailed insights into time spent on different projects, helping managers track project progress and resource allocation.
Key Features
- Project time distribution across team members
- Budget tracking and cost analysis
- Project status and milestone progress
- Billable vs non-billable hours comparison
- Custom date range selection
- Export capabilities (PDF, Excel, CSV)
Common Use Cases
- Resource allocation optimization
- Project budget monitoring
- Client billing documentation
- Project timeline analysis
- Team workload assessment
Task Reports
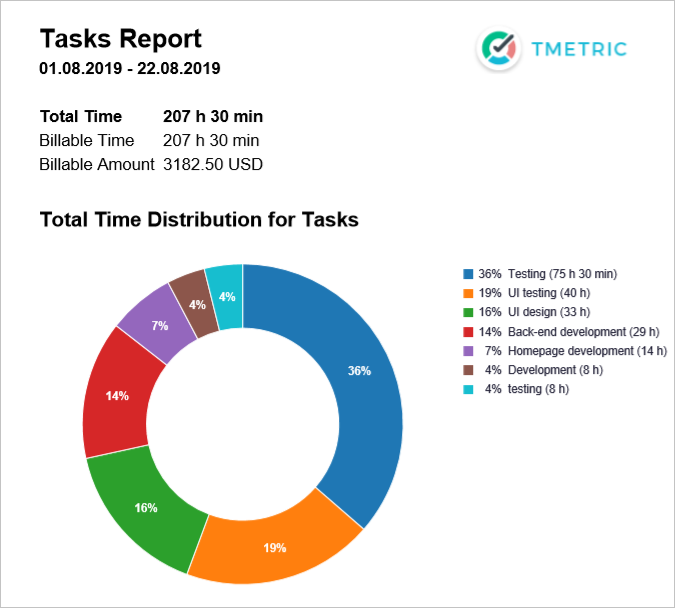
Overview: Task reports break down time spent on individual tasks and subtasks within projects, offering granular visibility into work activities.
Key Features
- Task completion status tracking
- Time estimates vs actual time comparison
- Task categorization and filtering
- Priority-based analysis
- Individual and team task views
- Integration with Jira tasks
Common Use Cases
- Sprint planning and tracking
- Individual productivity analysis
- Task estimation improvement
- Workflow optimization
- Backlog management
Team Reports
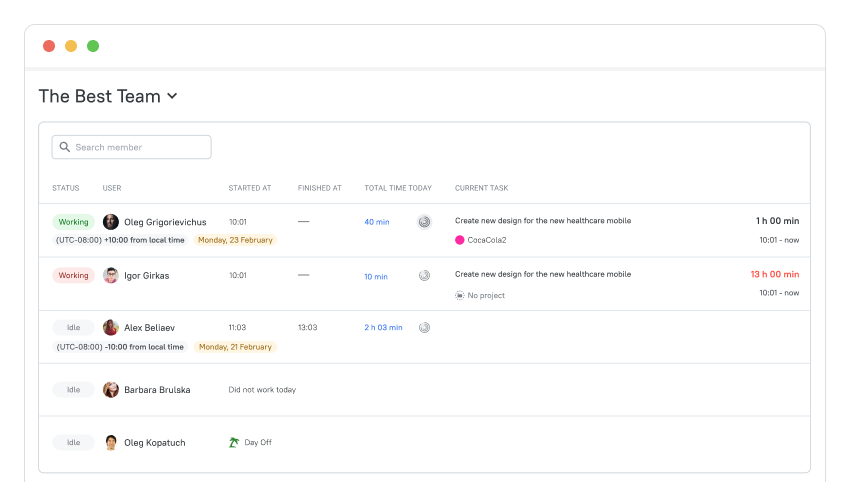
Overview: Team reports provide insights into team performance, workload distribution, and collaboration patterns.
Key Features
- Individual time logs per team member
- Team capacity utilization
- Attendance tracking
- Overtime monitoring
- Team productivity metrics
- Cross-project collaboration analysis
Common Use Cases
- Team performance evaluation
- Workload balancing
- Capacity planning
- Time-off management
- Team productivity optimization
Activity Reports

Overview: Activity reports track specific types of work activities, helping understand how time is spent across different categories.
Key Features
- Activity type categorization
- Time distribution by activity
- Idle time tracking
- Application and website usage monitoring
- Custom activity labels
- Detailed timeline views
Common Use Cases
- Process optimization
- Productivity analysis
- Time waste identification
- Work pattern analysis
- Activity-based costing
Jira Timesheet Reporting
Jira timesheet reporting with TMetric combines time tracking and resource management capabilities helping organizations:
- monitor work hours
- plan resources effectively
- make data-driven decisions.
Time Logging
Users can log time against issues using several methods:
- Directly from the issue view
- Through the timesheet grid view for bulk time entry
- Via the Jira mobile app for on-the-go tracking
- Using workflow automation triggers
- Through API integration for custom solutions.
Time Categories
Time can be categorized using:
- Work types (Development, Testing, Documentation, etc.)
- Custom fields for detailed breakdowns
- Account or cost center allocation
- Billable vs non-billable hours
- Project phases or sprints.
Viewing Options
Timesheets can be viewed in multiple formats:
- Daily Breakdown
- Weekly summary
- Monthly consolidated view
- Custom date ranges
- Per user, team, or project basis.
Capacity Planning
- Users can view team member availability
- Plan future resource allocation
- Set working hours and holidays
- Track overtime and time off
- Monitor utilization rates.
Workload Management
- Time spent by the user
- Project time allocation
- Team utilization
- Analyze current workload distribution
- Identify over-allocated resources
- Balance work across team members
- Forecast resource needs
- Track project staffing requirements
Real-time Analytics
- Resource utilization dashboards
- Time tracking compliance reports
- Project time consumption analysis
- Cost tracking and billing reports
- Custom reporting options
- Cost center analysis
- Billing summaries
- Custom field reports
- Cross-project analysis
- Trend visualization
- Performance metrics
- ROI calculations.
Approval Workflows
- Configure multi-level approval processes
- Set up automatic reminders
- Define approval thresholds
- Track approval status
- Handle timesheet rejections
Access Control
- Role-based permissions
- Team-level visibility settings
- Project-specific access rules
- Audit logs for changes
- Data export controls
Configuration Options
- Custom fields setup
- Work type definitions
- Time tracking policies
- Notification settings
- Integration configurations
Standard Integrations
- Calendar sync (Outlook, Google Calendar)
- Project management tools
- HR systems
- Accounting software
- Business intelligence platforms
API Support
- REST API endpoints for time data
- Webhook configurations
- Custom field mapping
- Bulk data operations
- Authentication methods.
Advanced Reporting Features
Filters and Customization
- Custom date ranges
- Multiple filter combinations
- Saved report templates
- Automated report scheduling
- Custom fields and tags
Data Visualization
- Interactive charts and graphs
- Time distribution heat maps
- Trend analysis
- Comparative analysis
- Dashboard customization
Export and Integration
- Multiple export formats (PDF, Excel, CSV)
- API access for custom reporting
- Integration with other tools
- Automated report distribution
- Data synchronization with Jira

Report Configuration
- Set up consistent naming conventions
- Define relevant custom fields
- Configure appropriate access permissions
- Create report templates for regular use
- Set up automated report scheduling
Data Quality
- Ensure accurate time entry
- Maintain proper task categorization
- Regular data validation
- Consistent activity labeling
- Proper project structure setup
Analysis Tips
- Compare data across different periods
- Look for patterns and trends
- Focus on actionable metrics
- Regular report review schedule
- Use appropriate visualization methods.
Best Practices for Time Tracking
- Log time regularly, preferably daily
- Use appropriate work types
- Include detailed work descriptions
- Link time to specific issues
- Follow organizational guidelines.

Best Practices for Resource Planning
- Maintain updated availability information
- Plan for buffer time
- Consider skill sets in allocation
- Monitor utilization trends
- Make regular capacity reviews.
Best Practices for Time Management Analytics
- Set up automated reports
- Define key metrics
- Regular timesheet audits
- Validate data accuracy
- Share insights with stakeholders.
How to Export Jira Time Reports?
Here's the general process:
- Log into your TMetric account
- Navigate to the Reports section
- Select "Time & Activity" or similar reports view
- Apply filters to select Jira-related time entries
- Look for an Export button (usually near the top-right)
- Choose your preferred export format (typically CSV or Excel)
Access the Time Tracking Reports:
- Log into Jira
- Go to "Reports" in the top navigation
- Select "Time Tracking Report" or "Workload Report"
Configure the Report Settings:
- Select your desired date range
- Choose the relevant projects and/or users
- Set any specific filters you need (like issue type, status, etc.)
- Pick the grouping options (by user, issue, project, etc.)
Export Options
For a basic export:
- Click the "Export" button (usually in the top right)
- Choose your preferred format (CSV, Excel)
- Download the file
For more detailed time tracking data:
- Use the "Time in Status" report
- Navigate to "Issue Analysis"
- Select "Time Tracking"
- Use the "Export" function there
Alternative Method using JQL:
worklogDate >= startOfMonth() AND worklogDate <= endOfMonth()
Then:
- Run the JQL search
- Click "Export"
- Select "Export Excel"
- Choose "Current Fields" or "All Fields"
Key Points:
- After generating the report, look for the export option, usually in the top right corner.
- Choose your preferred format (CSV, Excel, etc.) for export.
- Save the report to your device or share it directly with stakeholders.
Summary
Time tracking in Jira is essential for project managers, team leads, and business owners who need to monitor project progress, manage resources, and handle billing accurately.
Thus, efficient time tracking within JIRA implies correct configuration, correct time-logging behavior, and suitable reporting tools.
However, we were able to demonstrate that though Jira has rudimentary tracking, adding TMetric can help you greatly improve your reporting and analysis.


